I often get asked exactly how much do I do to my photographs in Photoshop. The answers is basically it depends. When I am post processing my film scans I tend to limit myself to what you might call darkroom techniques; dodging and burning, curves, and levels. Basically contrast control. The wet darkroom pretty much limits you to these adjustment and since I started in a wet darkroom I most often fall back to those basic techniques. I have run across many photographers who either boast that all they do is print in the traditional wet darkroom or only use traditional techniques in Photoshop. If that floats your boat then fine, but personally I like to use what ever tools I can to make my images better. More importantly I contend that regardless of how the final print is made the art show stand on its own independent of the technique used to create it. Photography is a unique art form that seems to attract people who are more interested in the technique, and find value in it more than in the quality of the final product.
Truth be told I find myself ignoring my wet darkroom these days and using my digital one much more. There are many reasons for this, but the main one is convenience. I like many photographers have a day job so I don't always have the time to spend hours in my darkroom. The luxury to be able to start and stop working on an image and start up right where you left off makes it so much easier to work through my images. As you may know you can't quite do this in a traditional darkroom. Plus using a wet darkroom requires a certain amount of setup and and clean up time. Finally scanner software allows us to make great prints from previously unprintable negatives. Some may argue that this allows us to be more lazy as photographers. That may be true, but I look at it this way, anything that allows me to spend more time creating a good image and less time on the technical aspects of photography the better. I should note that I am an Engineer so while I do like the technical aspects of photography I am much more interested in creating art and having photography be my break from my day job.
So after getting my start with film cameras and a traditional darkroom I have, like many others, started moving over to the digital world. Well at least a little bit. The first steps I took was a scanner, printer, and Photoshop so I could start printing my images digitally using scans of my negatives. Then last year I got my first digital SLR. I made the plunge mostly because I teach an intro to photography class on the weekends at
The Art League. I don't very often encounter students who are still using film equipment so I needed to be able to speak their language. One consequence of coming from a film background is that I find myself wishing I could add grain to my digital images. Though I also love the fine detailed editing I can do digitally. So here is an example of an image captured on my digital camera and a look into how I went about creating the final image. This isn't really meant to be an instruction manual, I am sure there are better ways to achieve what I did. I freely admit that I have allot to learn about Photoshop.
So first here is the basic image after some adjustments in the RAW editor. In a very real sense this is my digital negative (or positive if you will). The image is nice and neutral, which is always a great starting point. Much of the sky and dock are on the white side of the grey scale which will mean that any adjustment to a higher contrast will push them further to the white end. This will be my main issue to deal with. Obtaining the correct contrast for the couple and maintaining an interesting sky.
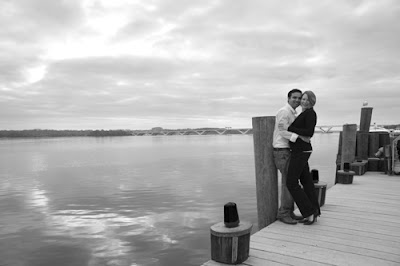 Image straight out of RAW editor
It is clear to me that I am going to have to work the contrast on the couple and dock area separate from the sky and water area. So the first thing I do is use a Levels adjustment layer and a Curves adjustment layer to adjust the contrast of the couple.
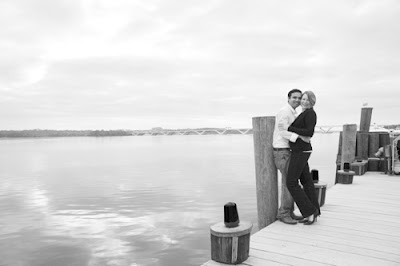 After Level and Curve Adjustment
As you can see by adjusting the contrast so that the details of the couple stand out I have washed out the dock and sky. So the next step is to bring back the sky and water. I use a layer mask. I make the couple and dock portion of the mask to be transparent allowing me to keep the adjustments I made. The rest of the image is now back to its original state. I could have gotten here using just a dodge and burn layer, but since I have more in mind I need to basically create a new starting point for contrast adjustments.
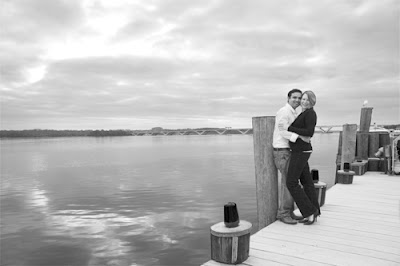 After Layer mask
Now I am going to add another Curve and Levels layer to once again bump the contrast. Focusing on getting the pop I want in the sky and water while keeping an eye on the dock and couple. I want to keep them in a range that I can dodge and burn back to what I want.
 After second Curve and Levels Layers
Now all I need is to dodge and burn certain areas. Mainly I need to dodge the couple and wood pylons to bring back the detail. I will also dodge the highlights in the sky and water to create a bit more contrast. Finally I will burn in the dock to help accentuate the grain and texture there. Here is a look at the naked Dodge and Burn layer I created show you the areas I lightened or darkened.
 Dodge and Burn Layer
 Final Image after Dodge and Burn Layer
 Adding HP5 grain and High Structure filter using Silver EFEX
 Close up of final image before Silver EFEX
 Close up after Silver EFEX
all images taken with Canon 20D
I'll let you be the judge on how good the grain is. I am a fan! This certainly won't make me drop my film cameras, I love them too much. As much as I complain about time spent developing film I really love everything about film. I am just happy to have an alternative for those times when I have to shoot digital or that time in the future when film may no longer be available. I don't actually think that will happen in my life time, but you never know.

 "Woodrow Wilson Bridge"
 "A last Goodbye"
 "Max"
"Max" "Tucker"


 Holga w/4x ND Filter
 Holga w/4x ND Filter
 Holga w/4x ND Filter
 Image straight out of RAW editor
 After Level and Curve Adjustment
 After Layer mask
 After second Curve and Levels Layers
 Dodge and Burn Layer
 Final Image after Dodge and Burn Layer
 Adding HP5 grain and High Structure filter using Silver EFEX
 Close up of final image before Silver EFEX
 Close up after Silver EFEX


